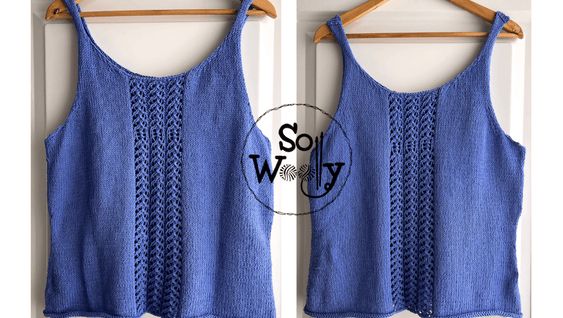
Knitted Tank Top
Knitted tank tops are the perfect blend of comfort and style for those warm summer days. Their lightweight fabric and breathable design make them a go-to choice for staying cool while looking effortlessly chic. Whether you're heading to the beach or meeting up with friends for a casual outing, a knitted tank top adds a touch of laid-back elegance to any outfit. The versatility of these tops allows you to easily dress them up with a pair of high-waisted jeans and sandals or keep it casual with shorts and sneakers. Embrace the cozy vibes of a knitted tank top and enjoy the easy-breezy feeling it brings to your wardrobe.
To make this Tank Top you’ll need
300 – 400 gr. (630 – 840 m) of a blend of cotton yarn and polyester (Light, DK, nº 3) #ad
(Check the quantities by size below)
2 markers
Scissors, tapestry needle, measurement tape, or rule
US 6 / 4 mm knitting needles #ad (or size needed to obtain gauge).
To Fit Bust Measurement / Yarn Quantity
Size S: 33 1/2 in (85 cm) – 300 gr.
Size M: 36 3/4 in (93 cm) 300 gr.
Size L: 41 in (104 cm) 350 gr.
Size XL: 44 in (113 cm) 350 gr.
Size XXL: 50 in (128cm) – 400 gr.
This is a loose Tank Top (it has 2 in – 5 cm of Positive Ease).
Choose your size according to your bust circumference measurement.
However, if you prefer a snug fit, go one size smaller.
Take a look at the final measurements, below.
Measurements of the Finished Tank Top (after blocking)
S: Bust Circumference 32 3/4 in (90 cm) – Total Length: 19 in (50.5 cm)
M: Bust Circumference 38 1/2 in (98 cm) – Total Length: 20 1/2 in (52 cm)
L: Bust Circumference 43 in (109 cm) – Total Length: 22 in ( 56 cm)
XL: Bust Circumference 46 1/2 in (118 cm) – Total Length: 22 3/4 in 58 cm
XXL: Bust Circumference 52 in (133 cm) – Total Length: 24 in (61 cm)
Gauge Swatch
A 5 x 5 in (10 x 10 cm) square knitted in Stockinette stitch equals 22 stitches and 27.5 rows.
Don’t forget that if your gauge is different, the size of your tank top will be different too.
So take your time and knit a swatch ?
If you’re getting fewer stitches per inch, go down a needle size; if you’re getting more stitches, go up a needle size.
Abbreviations
CO: Cast on
st: Stitch
WS: Wrong side of the work
RS: Right side of the work
M: Marker
PM: Place marker
SM: Slip marker
P: Purl
K: Knit
yo: Yarn over
sd: (Simple Decrease) Slip one stitch as if to purl, knit the next, and pass the slipped stitch over the last one
dd: (Double Decrease) Slip one stitch as if to purl, knit two stitches together, and pass the slipped stitch over the last one
k2tog: Knit two stitches together
ssk: Slip, slip, knit (slip one stitch as if to knit, slip the next same way, place both stitches back onto the left-hand needle, and knit them together)
m1L: Make one left-leaning increase. Pick up the bar between the stitch you knit and the one you’re about to knit, bringing the needle from back to front. Then knit that stitch through the back loop
m1R: Make one right-leaning increase. Pick up the bar between the stitch you knit and the one you’re about to knit, bringing the needle from front to back. Then knit into the front of the stitch
BO: Bind off
Notes Before Starting
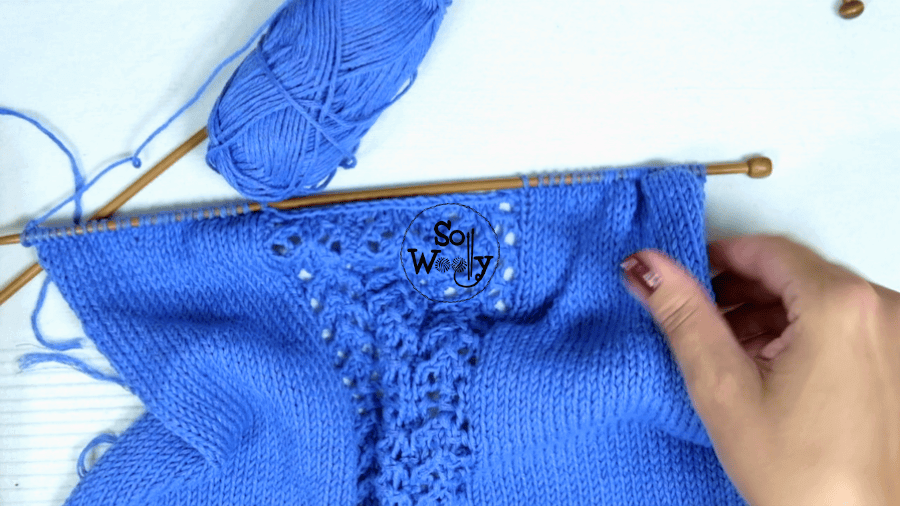
We’ll start with a setup row (row 0), to place the markers that separate the central lace panel, which has the same width for all sizes (21 sts/ 3 repeats of the lace pattern).
The odd rows form the RS of the work.
How to knit the Back and Front of the Tank Top
CO 95-105-117-127-143 stitches.
Setup row (WS): P 37-42-48-53-61, PM, P 21 (central lace panel sts), PM, P 37-42-48-53-61.
Row 1 (RS): K to M, SM, [*P1, yo, sd, K1, k2tog, yo, P1*] 3 times, SM, K to end
Row 2: P to M, SM, [*K1, P5, K1*] 3 times, SM, P to end
Row 3: K to M, SM, [*P1, K1, yo, dd, yo, K1, P1*] 3 times, SM, K to end
Row 4: P to M, SM, [*K1, P5, K1*] 3 times, SM, P to end.
Straight Section: Repeat rows 1 – 4 until the piece measures 2 1/2 in (4, 5, 6.5, 6.5, 7.5 cm) approximately, ending with a WS row.
How to decrease to shape the waist
Row 1 (Decrease Row RS): K2, ssk, work in pattern to last 4 sts, k2tog, K2. 2 sts decreased.
Rows 2, 4, and 6 (Rest Rows WS): As per every even row (no decreases will be made).
Rows 3 and 5: Work in pattern without decreasing.
Repeat these 6 rows 4 more times. 10 sts decreased.
85-95-107-117-133 sts remain.
Straight Section: Continue working in pattern without decreasing, for 1 1/4, 1 1/4, 1 1/5, 1 3/4, 2 in (3, 3.5, 4, 4.5, 5 cm), ending with a WS row.
Increase Section (Bust Shaping)
Row 1 (Increase Row RS): K2, m1L, K to last 2 sts, m1R, K2. 2 sts increased.
Row 2 (Rest Rows WS): As per every even row (no increases will be made).
Repeat rows 1 and 2, 4 more times. 10 sts increased.
95-105-117-127-143 sts remain.
Straight Section: Work in pattern without increasing until the piece measures 10 3/4, 11 1/5, 12 1/2, 13, 13 3/4 in (27.5, 29, 32, 33, 35 cm), ending with a WS row.
Armhole shaping
BO 2-3-4-5-7 sts at the beginning of the next 4 rows (BO knitwise when working an RS row; purlwise when working a WS row).
BO 2-3-4-6-8 sts at the beginning of the next 2 rows (BO knitwise when working an RS row; purlwise when working a WS row).
6 rows in total, 83-87-93-95-99 sts remain.
Row 7 (Decrease Row RS): K3, ssk twice, work in pattern to last 7 sts, k2tog twice, K3. 4 sts decreased.
Rows 8 and 10 (Rest Rows WS): As per every even row (no decreases will be made).
Row 9: Work in pattern without decreasing.
Repeat rows 7, 8, 9, and 10, 3 more times.
16 rows in total, 16 sts decreased.
67-71-77-79-83 sts remain.
Straight Section: Keep working in pattern without decreasing until it measures 4, 4 1/2, 5 1/2, 5 1/2, 6 in (10, 11.5, 14, 14, 15 cm) from the first armhole decrease row.
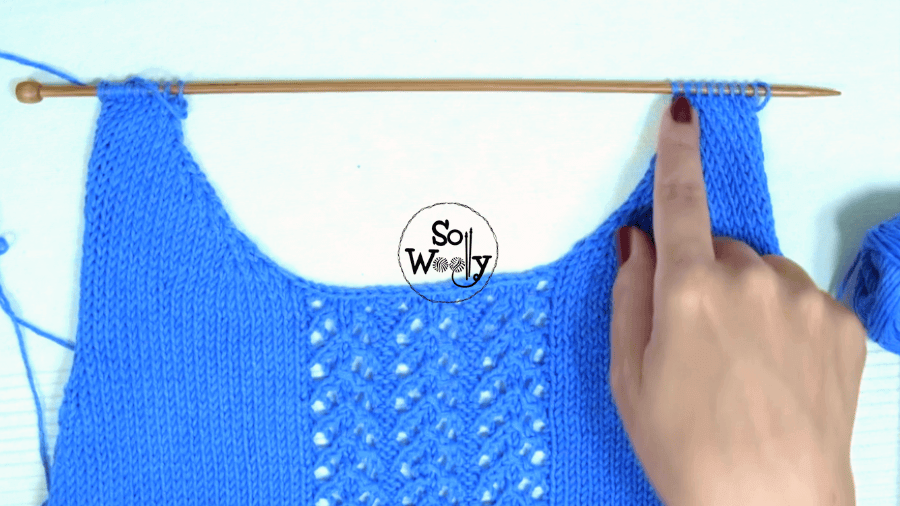
How to shape the neckline
Row 1 (RS): K 23-25-28-29-31 sts, BO knitwise 21 sts (central lace panel), K to end (23-25-28-29-31 sts).
This will split the piece into two sides, and we’ll work simultaneously.
Row 2: P across and join a second ball of yarn for the other side, and P to end.
Row 3: K the first side to last 8 sts, k2tog (4 times). 4 sts decreased.
For the other side, ssk (4 times), K to end. 4 sts decreased.
19-21-24-25-27 sts remain on each side.
Row 4: P across on both sides.
Row 5: K to last 4 sts, k2tog twice. 2 sts decreased.
For the other side, ssk twice, K to end. 2 sts decreased.
Row 6: P across on both sides.
Repeat rows 5 and 6, 4 more times. 10 sts decreased on each side.
9-11-14-15-17 sts remain on each side.
Straight Section: Continue working until the armhole measures 7 1/2, 7 3/4, 8 1/2, 9, 9 1/2 in (19, 20, 21.5, 23, 24 cm) from the first armhole decrease row, ending with a WS row.
How to bind off
Size S: BO 9 sts knitwise on each side.
Size M: BO 6 sts at the beginning of the next 2 rows, and 5 sts at the beginning of the next 2 rows.
Size L: BO 7 sts at the beginning of the next 2 rows, and 7 sts at the beginning of the next 2 rows.
Size XL: BO 8 at the beginning of the next 2 rows, and 7 sts at the beginning of the next 2 rows.
Size XXL: BO 9 sts at the beginning of the next 2 rows, and 7 sts at the beginning of the next 2 rows.
How to sew up the front and the back
Block both pieces, join the shoulders, and then, the sides using the mattress stitch technique (as shown in the video tutorial).
Weave in ends, et voilà!