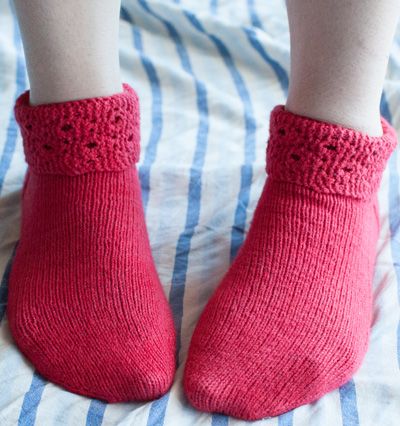
Knitted Feel Good Sock
The Knitted Feel Good Sock is your new favorite cozy companion! These soft and stretchy socks are perfect for lounging around the house or staying warm on chilly nights. The adorable design and snug fit will make you smile every time you put them on. Treat your feet to the ultimate comfort and style with the Knitted Feel Good Sock - they're like a warm hug for your toes!
SIZE
Adult XS[S, M, L, XL]
Print With Images Print Without Images
FINISHED MEASUREMENTS
Foot circumference: 7[7.5, 8, 8.5, 9] inches
Foot length: adjustable to fit
Leg length: Cuff measures approximately 2 inches from top of heel
Choose a size with approximately 10% negative ease in the foot circumference.
MATERIALS
Yarn
spacer Feel Good Yarn Company’s Silver Spun Sock [87% combed cotton, 5% silver, 5% nylon, 3% spandex; 400yds per 87g skein]; color: Primrose; 1 skein
Recommended needle size
[always use a needle size that gives you the gauge listed below — every knitter's gauge is unique]
1 set US #1.5/2.5mm needles for small circumference in the round
Notions
2 safety pins or removable stitch markers
2 other stitch markers
yarn needle
GAUGE
32 sts/48 rounds = 4 inches in stockinette stitch using 2.5mm needles, lightly stretched.
PATTERN NOTES
Judy's Magic Cast-on
Chinese Waitress Cast on
This cast on method is an interesting evolution of the cable CO, but creates a stretchier edge. It’s particularly useful in this situation, as it doesn’t require a long tail.
See Cap Sease’s book ‘Cast On, Bind Off: 211 Ways to Begin and End Your Knitting’ for more information. Very Pink Knits offers a terrific video tutorial here.
If you’re unsure about this method, a cable cast on works well here, too – just keep it loose.
Lace Edging Pattern
Row 1 [RS]: K3, yo, ssk, k3, k2tog, yo, k3, yo, ssk, k2, ssk.
Row 2 [WS]: Sl1, k17.
Row 3 [RS]: K4, yo, ssk, k1, k2tog, yo, k5, yo, ssk, k1, ssk.
Row 4 [WS]: Sl1, k16, kfb.
Row 5 [RS]: K6, yo, sl 1, k2tog, psso, yo, k1, sl 1, k2tog, psso, yo three times, sl1, k2tog, psso, yo, k2, ssk.
Row 6 [WS]: Sl1, k5, p1, k12.
Row 7 [RS]: K4, k2tog, yo, k3, yo, ssk, k3, k2tog, yo, k2, ssk.
Row 8 [WS]: Sl1, k18.
Row 9 [RS]: K2, sl 1, k2tog, psso, yo, k5, yo, ssk, k1, k2tog, yo, k3, ssk.
Row 10 [WS]: Sl1, k17.
Row 11 [RS]: K2, yo, k2tog, sl 1, k2tog, psso, yo three times, ssk, k1, yo, sl 1, k2tog, psso, yo, k4, ssk.
Row 12 [WS]: Sl1, k10, p1, k6.
DIRECTIONS
Using Judy’s Magic Cast-on, CO 20[20, 24, 24, 24] sts –10[12, 12, 12] sts on each of two needles.
If you’re working on DPNs, start as follows:
Round 1: K10[10, 12, 12, 12] with one needle, k5[5, 6, 6, 6] with a second, and k5[5, 6, 6, 6] with a third. The first stitch may be loose – twist the tail around the working yarn when you work it.
If you’re working with magic loop or 2 circulars, start as follows:
Round 1: K10[10, 12, 12, 12] with one needle, and k10[10, 12, 12, 12] with a second. The first stitch may be loose – twist the tail around the working yarn when you work it.
Place a safety pin or marker in the toe to indicate the start of the round, and a second to indicate the center of the round.
Round 2, increase: Kfb, knit to 2 sts before center of round, kfb, k1; kfb, knit to 2 sts before end of round, kfb, k1; 4 sts increased.
Round 3: Knit around.
Repeat the above two rounds 8[9, 9, 10, 11] more times, until you have 56[60, 64, 68, 72] sts total on your needles.
Knit all rounds until sock measures 3.25[3.5, 4, 4.25, 4.5] inches short of full foot length (approximately 4.25[4.75, 5, 5.5, 6, 6.5, 6.75, 7.25, 7.5] inches), measured slightly stretched.
Shape Gusset
Gusset setup round: Knit around, until 1 st remains. To make the gusset increases simpler, slip this remaining stitch to the first needle of the round.
Gusset Round 1: Kfb, place first heel marker, knit to 1 st before the center of round, kfb; knit to end of round. 2 gusset sts increased; 58[62, 66, 70, 74] sts total.
Gusset Round 2: K to 1 st before the center of the round, place second heel marker, k to end of round.
You should be set up as follows: There will be 2 sts before the first marker, the sole stitches (half the total stitch count) between the two markers, 1 (newly created) gusset st after the second marker. For ease of working, keep all these sts grouped together on one needle.
The remaining 28[30, 32, 34, 36] sts of the round form the instep. If you’re on DPNs, split them across two needles; if you’re on Magic Loop or Two circulars, they should be grouped together on the other side/needle.
Round 3: Kfb, k until 1 st remains in gusset, kfb; knit to end of round. 2 gusset sts increased.
Round 4: Knit around.
Repeat Rounds 3-4 9[10, 11, 12, 13] more times. 78[84, 90, 96, 102] sts total.
The Short Row Gusset Heel
This is worked back and forth in rows on the stitches between the heel markers.
To setup, knit the first st on the sole, and slip that to the last needle of the round. This restores the original start of round.
Short Row 1 [RS]: Knit to first marker, slip marker, knit to 1 st before second marker, w&t.
Short Row 2 [WS]: Purl to 1 st before marker, w&t.
Working only on the heel stitches, continue:
Short Row 3 [RS]: Knit to st before last wrapped st, w&t.
Short Row 4 [WS]: Purl to st before last wrapped st, w&t.
Repeat Short Rows 3-4 7[8, 9, 9, 10] more times, until 10[10, 10, 12, 12] sts remain unwrapped in the middle, ending with a WS row.
At this point, you can remove the heel markers.
Heel Flap
Row 1 [RS]: K10[10, 10, 12, 12], knit the next 8[9, 10, 10, 11] sts together with their wraps; work an ssk on the last heel stitch (together with its wrap) and the first of the gusset stitches. Turn.
Row 2 [WS]: Sl1, p18[19, 20, 22, 23], purl the next 8[9, 10, 10, 11] sts together with their wraps; work p2tog on the last gusset stitch (together with its wrap) and the first of the gusset stitches. Turn.
Row 3 [RS]: Sl1, k26[28, 30, 32, 34], ssk, turn.
Row 4 [WS]: Sl1, p26[28, 30, 32, 34], p2tog, turn.
Repeat the last 2 rows 8[9, 10, 11, 12] more times, until all but one of gusset stitches on each side have been decreased. 58[62, 66, 70, 74] sts remain. RS will be facing.
The Leg & Cuff
From here, you will restart working in rounds. The two final gusset decreases are worked in the first round of the leg.
Note: I find that delaying these final two gusset decreases makes the top of the heel neater, the join smoother, and helps reduce the risk of that pesky hole.
First leg round: Sl1, k26[28, 30, 32, 34], ssk, k across instep sts; k2tog, k27[29, 31, 33, 35] to end of heel sts. This is the new start of round. 56[60, 64, 68, 72] sts.
Next leg round, start ribbing: [K1, p1] around.
Work ribbing as set for 2 inches.
For second and fifth sizes, proceed to Edging.
First size only, setup for Edging: [(K1, p1) 13 times, k2tog] twice. 54 sts.
Third size only, setup for Edging: [(K1, p1) 16 times, m1] twice. 66 sts.
Fourth size only, setup for Edging: [(K1, p1) 16 times, k2tog] twice. 66 sts.
Edging
Turn work so WS is facing. Using the Chinese Waitress Method, CO 18 sts.
Work Lace edging from written or chart instructions. The decrease worked at the end of RS rows attaches edging to cuff, and decreases away one stitch of the cuff.
Work Lace edging around until you have worked 9[10, 11, 11, 12] full repeats.
After final row, BO, and cut yarn, leaving a 4-inch tail.
spacer
FINISHING
Wash socks to block. Fold cuff down towards the outside, and with RS facing, seam together CO and BO edges of edging, making sure you close up any gaps where the edging meets the cuff top at the join. Weave in ends.