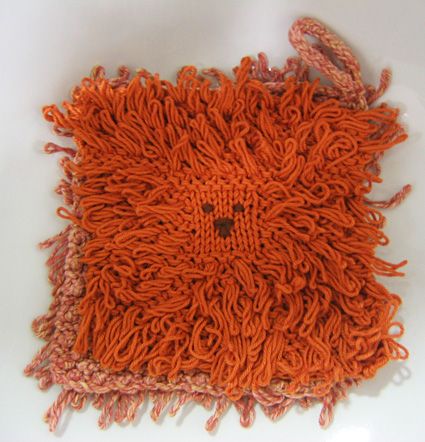
Knitted Adorable Washcloth
Knitted adorable washcloths are like little bundles of joy for your daily routine! Not only do they add a cozy touch to your bathroom decor, but they also make washing up feel extra delightful. With their soft texture and charming designs, these washcloths are perfect for adding some warmth and fun to your everyday tasks. Whether you're looking to pamper yourself or add a sweet touch to your bathroom, these knitted washcloths are sure to put a smile on your face every time you use them.
SIZE
one
FINISHED MEASUREMENTS
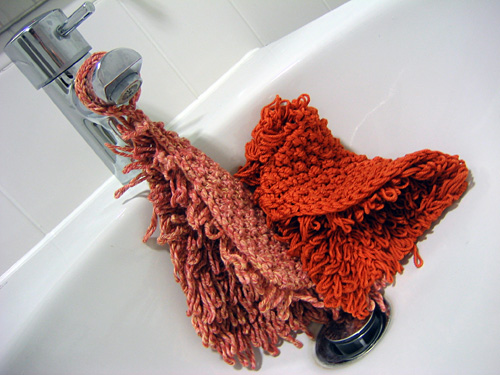
Single stranded version: 8 inches square
Double stranded version: 7 inches square
Note: Measurements given include the added width created by loops.
MATERIALS
Single stranded version [mottled orange]:
RYC Cotton Jeans [100% cotton; 82yd/75m per 50g skein]; color: #369 Madras; 1 skein
1 pair US 5/3.75mm straight needles
2 US 5/3.75mm double-point needles (optional; used for I-Cord hanging loop)
Double stranded version [solid dark orange]:
Jaeger Aqua Cotton [100% cotton; 115yd/106m per 50g skein]; color: #335 Pumpkin; 1 skein
1 pair US 7/4.5 mm straight needles
2 US 7/4.5 mm double-point needles (optional; used for I-Cord hanging loop)
Small amount of dark-colored, thin, smooth, machine-washable yarn for embroidering face (I used a brown sock yarn)
Embroidery needle
GAUGE
Single stranded version: 20 sts/26 rows = 4 inches in stockinette stitch
Double stranded version: 16 sts/20 rows = 4 inches in stockinette stitch
PATTERN NOTES
[Knitty's list of standard abbreviations and techniques can be found here]
If you are working a double-stranded version, hold two strands of yarn together throughout.
ML = Make loop. K1, but do not drop stitch from left needle. Bring yarn between needles to front of work. Holding left thumb in front of work, wrap yarn once around thumb to create a loop approx. 2 inches long. Bring yarn between needles to back of work, and knit into same stitch again, dropping stitch from left needle as usual. Bring yarn forward over right needle, then between needles to back of work, creating a loop around righ t needle. Pass 2 sts just worked over this loop.
Knitters will probably find that the length of their loop depends on their personal style of knitting. It does not matter if the loops are slightly longer or shorter than 2 inches; just remember that, if you make larger loops, you will use more yarn.
Loop Stitch (Worked over an even number of sts):
Row 1 [RS]: Sl 1, [k1, ML] to last st, k1.
Row 2 [WS]: Sl 1, k to end.
Row 3 [RS]: Sl 1, [ML, k1] to last st, k1.
Row 4 [WS]: Sl 1, k to end.
Repeat these 4 rows for Loop Stitch.
If you find it difficult to count the rows you have worked, count the bumps on the WS of the work instead; they are much easier to count than the rows hidden by all the loops.
The pattern as written has a face section that is 6 sts wide, with a 9-st Loop Stitch mane on either side. This was the pattern used for the single stranded example shown. For the double stranded version I cast on only 22 sts, and worked a 6-st face with an 8-st mane. I also worked it slightly shorter, with only 12 rows of Loop Stitch in the upper and lower sections, and 9 rows of stockinette st for the face.
PATTERN
Lower Section
CO 24sts.
K 1 row (a WS row).
Work 16 rows in Loop Stitch.
Center Section (Face)
Next Row [RS]: Work 9 sts in Loop Stitch as set, k6, work remaining 9 sts in Loop Stitch as set.
This row sets pattern for Center Section.
Work 10 more rows in pattern as set, maintaining 9 sts at either side in Loop Stitch and working 6 sts at center in stockinette st.
Next Row [WS]: Sl 1, k to end. Face is complete.
Upper Section
Work 16 rows in Loop Stitch.
If you do not wish to make the I-Cord hanging loop, BO all sts.
Hanging Loop:
BO 21 sts, k to end. Slip remaining 3 sts to double-point needle.
Next Row: Instead of turning work around to work back on the WS, slide all sts to other end of needle, switch needle back to your left hand, bring yarn around back of work, and start knitting the sts again. I-Cord is worked with RS facing at all times.
Repeat this row to form I-Cord. After a few rows, work will begin to form a tube.
Continue in I-Cord until cord measures 4 inches.
BO all sts and break yarn, leaving a tail approx. 6 inches long. Use this tail to sew cord into a loop.
FINISHING
Using dark-colored yarn, embroider lion's nose and eyes.