Knitted Fish Decor
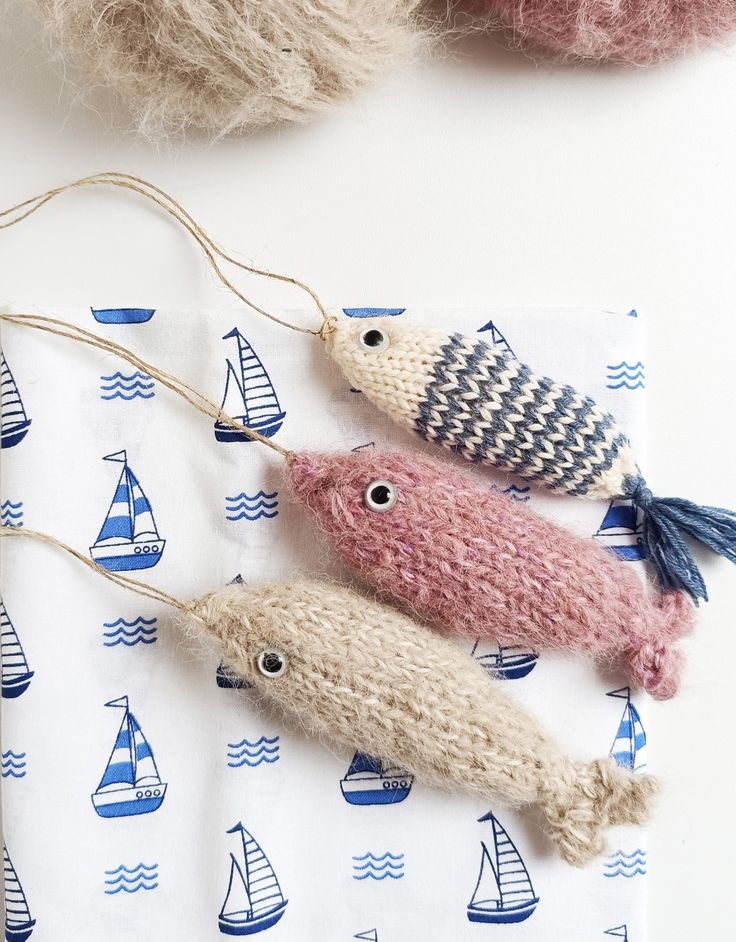
Knitted fish decor adds a whimsical touch to any space, bringing a cozy and charming feel to your home. These unique and playful creations can brighten up a room and spark conversations with their quirky designs. Whether hanging on walls or adorning shelves, knitted fish decor is sure to make you smile every time you catch a glimpse of their cute details. They are a fun and creative way to personalize your living space and showcase your love for handmade items. So go ahead, dive into the world of knitted fish decor and let these delightful pieces swim into your heart!
PATTERN
Techniques and Abbreviations: Cast on (co), knit stitch (k), knit into the front and back of the stitch (kfb), bo (bind off), stitches (sts). You’ll need to know how to knit in the round using circular needles or double-pointed needles and how to join invisibly by casting on an extra stitch (instructions here).
Yarn: Less than 40g of DK yarn (I used Hobbii Upcycled Suri Alpaca and Friends Cotton Linen in the colours 01 and 05) held double. You can use any yarn you like, but for the same fuzzy effect you can get a great result by using brushed yarn, or mohair combined with cotton or acrylic yarn.
Tools: 5mm longer-length circular needles for the magic loop method or double pointed needles, a stitch marker, scissors, a small amount of scrap yarn or toy filling for stuffing, two safety toy eyes or embroidery thread if you prefer sewn on eyes, a small length of jute for the hanging cord.
NOTES
IMPORTANT: Be careful when using safety eyes if you’re planning on giving your finished Feesh to a small child (under three). Although they are very reliable (and look very cool and fish-like) accidents can happen and it’s always best to embroider eyes onto items intended for gifting to young kids. You may also want to leave out the jute hanging cord.
The measurements of your finished Feesh will vary depending on the yarn you use, the thicker the yarn the bigger your finished item will be and vice-versa.
Knitting on a small scale can be a bit fiddly and takes some practice. Some might find the decrease section at the end of the pattern quite tricky. If this is the case, feel free to bind off your work after step 23. This may leave you with a more rounded face for the Feesh but is an option you can try if you’re getting frustrated.
The stitch pattern for the middle section of the Feesh (where you can involve different stitches or design techniques – see main ‘pattern ‘Method’ section) works on a multiple of two/four stitches, something to bear in mind for any stitch patterns you have in mind that require specific numbers of stitches (1×1 ribbing, for example).
METHOD
- Co 11 sts and join invisibly, decreasing one st (10 sts). Place marker to indicate the beginning of the round.
- Kfb, k until one st before marker, kfb (12 sts).
- K to end.
- K to end.
- Kfb, k until one st before marker, kfb (14 sts).
- K to end.
- K to end.
- Kfb, k1 until one st before marker, kfb (16 sts)
- K every round for 13 rounds, ending on round 23.
At this point you can involve a different colour or style of yarn or a technique like fair isle to decorate the middle section of the Feesh. I used alternating rounds of blue and white yarn to create the striped fish in the images, or you can simply carry on knitting every round plain.
23. *K2tog (8 sts)
24. K to end.
25. K to end.
26. K2tog three times (3 sts).
27. Bo all sts, leaving a tail of around 30cm.
Weave your yarn tail in and out of these bound off stitches. This is the front of your Feesh.
Attach the safety eyes at this point or embroider the eyes on carefully. Stuff the Feesh lightly and then seam the opposite end (tail end).
MAKING THE TAIL:
Make a slipknot and put it on your needle. Co one more sts (2 sts).
Knit four rows and slide your work down your needle. Break the yarn and repeat the previous steps again. Break yarn. You should have four stitches on your needles on two separate pieces. We’ll now join them together.
Attach your yarn one more time and knit across all four stitches. Knit two more rows and then bind off.
At this point you’ll have quite a few ends to weave in, so weave them all down towards the bind off edge and we’ll tidy them up properly later on.
Put this piece to one side and seam the tail to the bound off edge of our work neatly, making sure that the ends are securely inside your work.
Alternatively, you can create a different type of tail by making a small attached tassel and attaching it to the end (instructions here) as shown in the blue and white striped Feesh. This gives your fish a really fancy look! You can also make another two tassels and attach them to either side of your fish to create fins.
The final step (optional) is to thread some jute twine onto a needle and thread it onto the face of the Feesh. This creates the hanging cord. Now you have finished and to make a dozen more!