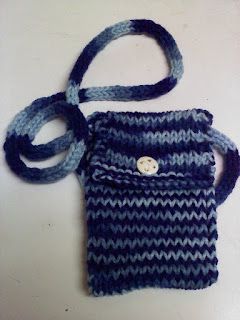
Knitted Adorable Pouch
Knitted adorable pouches are like a warm hug for your essentials! These charming little accessories are not only practical but also a stylish way to keep your keys, coins, or small trinkets organized. The intricate patterns and cozy textures of knitted pouches add a touch of handmade charm to your everyday routine. Whether you're using them to store your lip balm or to add a pop of color to your bag, these pouches are sure to bring a smile to your face every time you reach for them. Plus, they make wonderful gifts for friends and loved ones, spreading a little bit of handmade joy wherever they go.
You will need:
- size 8 dpn (set of 4)
- Red Heart Supersaver (one skein makes more than one pouchie)
- small button (maybe half an inch? never measured, just matched them to the yarn from my stash)
- sewing needle and thread for button
- darning needle or crochet hook for weaving in ends and attaching strap
My gage was the 17/23 listed on the ball band, but yours may vary. It isnt critical to this project, but it shouldnt be terribly loose. This does have a bit of stretch to it, so account for some give.
Cast on 30 sts, and divide onto needles (10 on each), keeping a long tail for sewing up the bottom later.
Work in the round for 6".
At the beginning of the next row, bind off 15 stitches.
Flap: working on 2 dps back and forth
Work the remaining 15 sts in st st, making sure to work the first 2 and last 2 stitches of each row in garter (prevents curling).
Work for 2" from the bind off.
Buttonhole:
RS row: k7, yo, k2tog, k to end of row
Next row: k (garter edge)
BO
Weave in flap ends
Use the long cast on tail to sew the bottom together (I used a fake grafting to sew mine, adds that little bit more support)
Strap:
Cast on 3 stitches, leaving a tail for attaching
Work in i-cord for 48" stretched, or for however long you wish. Make sure you account for stretching! The weight of your phone and goodies will pull the icord longer than you made it. To make mine, I kept stretching it around a wooden ruler, make measuring easy too.
Bind off, leaving a tail for sewing.
Using the tails, attach the icord to either side of the flap, to the bound off stitches not the flap itself. Weave in ends,
Sew on your button, add a motif if desired (one that stretches 15sts by 15 sts fits best